A release in a software ecosystem is a way to package and version software at a specific point in time. GitHub releases are an efficient and standard way of packaging and distributing software.
In this blog post, we will see how to create a GitHub release and automate it using the release-it npm package. We will also see how to generate GitHub release notes from commit messages.
Table of Contents:
- Setting up the project
- Understanding Github release and tags
- Installing and Configuring release-it
- Running release-it and verifying release on Github
- How release-it increments the release version
- How to generate GitHub release notes from commit messages
- Adding a GitHub action to automate the release process with release-it
1. Setting up the project
For this post, we have a simple typescript supported NodeJS application. Without going into much details on it again, it is recommended to check it here.
2. Understanding github release and tags
2.1. Git Tag
A tag is a git concept. Tag is a reference to a git repository which points to a commit. A git tag has two variations .i.e. lightweight and annotated. In an annotated tag, we can add details such as a message with -m flag.
git tag 1.0.0creates a tag on the repository.git show 1.0.0shows details of the tag such as commit it points to.git rev-parse 1.0.0returns the commit hash.git taglists all the tagsgit tag -a 1.0.0 -m "The annotated tag"creates an annotated tag with messagegit tag -d 1.0.0deletes a taggit tag -a 1.0.0 9633554 -m "a tag at previous commit"creates an annotated tag on the repository at an older commit using the commit hash (in this case 9633554)
2.2. Github Release
Unlike a Git tag, a release is a concept associated with GitHub. A GitHub release is different from a Git tag, but it may rely on a Git tag. A GitHub release uses a git tag and adds additional features such as release notes, repository asset download options, and visibility on the GitHub UI.
We can follow these steps to create a release on github using the Github UI:
- Navigate to the repository where you want to create a release.
- In the sidebar, click on the “Releases” link.
- Click the “Draft a new release” button.
- Choose an existing tag or create a new one.
- Optionally, click the “Generate release notes” button to include them.
- You can also drag and drop into the “Attach binaries by dropping them here or selecting them” area.
- To make the release public immediately, click “Publish release,” or click “Save draft” to save it for further edits before publishing.
3. Installing and configuring release-it (npm package)
3.1. Installing release-it in npm project
The release-it package is used in npm based projects for automatically managing github releases using cli commands. Key benefits of using release-it for managing the github releases are listed below:
- Bump release version in package.json file.
- Perform actions (using hooks) before creating release such as running code quality checks and unit tests.
- Generating change logs.
- Managing releases by incorporating them into CI / CD pipelines.
Let’s follow these steps to install and configure release-it:
Install package in your npm project as development dependency with npm i -D release-it.
Add release script in scripts tag of package.json file.
"scripts": {
    "release": "release-it"
  }
3.2. Configuring release-it
By default, release-it can pick configuration from these files automatically:
.release-it.json.release-it.ts.release-it.jsor.release-it.cjsthroughmodule.exports = {}.release-it.yaml.release-itproperty inpackage.jsonfile.
Lets create a .release-it.json file in the project root to make release-it follow the configurations from there.
{
    "$schema": "https://unpkg.com/release-it@17/schema/release-it.json",
    "git": {
      "commitMessage": "chore: release v${version}",
      "commit": true,
      "tag": true,
      "push": true
    },
    "github": {
      "release": true
    },
    "npm": {
        "publish": false
    }
}
Each key in the JSON file contains relevant settings, for all the available options refer to this documentation.
We can further explore all the available settings. The above basic configuration tells release-it to create a commit for release. Add a new tag as per semantic versioning. Also push the commit to remote repository.
Just like any other push to the repo, the working directory should be clean before you start the release process. Otherwise, release-it will raise error that you need to either stash or commit your changes. We have the option to alter this behavior by changing git.requireCleanWorkingDir
3.3. Using release-it with and without –ci flag
By default, release-it will follow certain prompts during the release. Which is alright if you are managing it through command line manually.
If we need to do it without prompts, which indeed is a requirement if we want to truly automate it. we should use the --ci flag. So the change in script should look like as below.
"scripts": {
    "release": "release-it --ci"
  }
3.4. Add a github token for release-it
A github token is required by release-it to create a release seamlessly. Otherwise, release-it will end-up providing us with the create release page link with pre-populated description box.
We should create a personal access token which has permissions only for the repository we are working on. Here you can learn how to create one.
Next, we need to add this token in .env file and this should never be available for public view.
GITHUB_TOKEN=github_pat_XXXXXXXXXXXXXXXXXXXXXXXXXXXXXXNow, we need make sure that release-it can read from .env file. We need to install dotenv-cli package as development dependency. We also need to make changes in the script as follows:
"scripts": {
    "release": "dotenv release-it -- --ci"
  },
Finally, we need to make sure that release-it is reading from the same environment variable. github.tokenRef is the configuration used to set the variable name. The .release-it.json file looks as below:
{
    "$schema": "https://unpkg.com/release-it@17/schema/release-it.json",
    "git": {
      "commitMessage": "chore: release v${version}",
      "commit": true,
      "tag": true,
      "push": true
    },
    "github": {
      "release": true,
      "tokenRef": "GITHUB_TOKEN"
    },
    "npm": {
        "publish": false
    }
}
4. Running release-it and verifying Github release
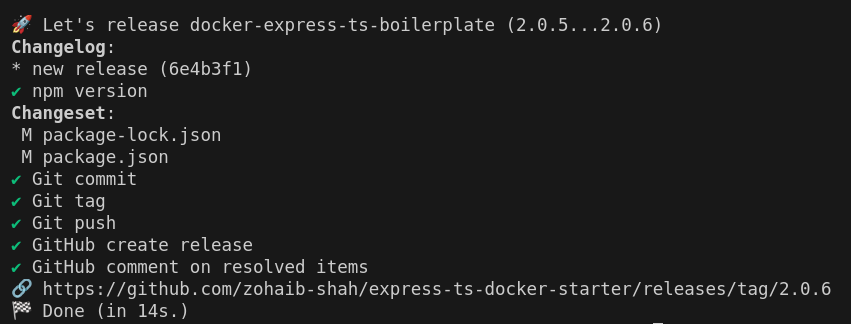
Once you have some new commits and ready for a new release. Go ahead and run npm run release, As we are using --ci flag, no additional prompts will appear.
While releasing a new version of your code without any change or additional commits is pointless, we will also face error from release-it console if we do so.
If everything goes well, we should see our console displaying something like this.
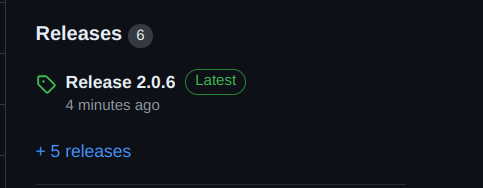
on the github repository page, we should see release info on the right side panel.
5. How release-it increments release version
Following are the increment options provided by release-it, which increments the release number accordingly. If we take 1.0.0 as the current version:
patchwill increment the last digit, i.e., 1.0.1.minorwill increment the middle digit, i.e., 1.1.0.majorwill increment the first digit, i.e., 2.0.0.prereleasewill add another digit after a hyphen and continue incrementing it for subsequent pre-releases.
Default behavior is to treat a release as a patch. We can modify this by updating the script as below for other options.
scripts": {
    "release": "dotenv release-it -- patch --ci"
  }
 "scripts": {
    "release": "dotenv release-it -- minor --ci"
  }
 "scripts": {
    "release": "dotenv release-it -- major --ci"
  }
 "scripts": {
    "release": "dotenv release-it -- prerelease --ci"
  }
6. How to generate GitHub release notes from commit messages
Discussing conventional commits is beyond the scope of this write-up. In summary, conventional commits are a widely accepted specification for writing commit messages. To learn more, refer to this documentation.
The good thing about release-it package is that it allows us to extend its functionality using plugins. Here, we will utilize one such plugin @release-it/conventional-changelog. This plugin enables us to maintain change logs in CHANGELOG.md file.
More importantly, the conventional changelog plugin also decide which release version should we increment to. Following are the rules which it considers when determining the new release version:
- Commits with
fix:type is a patch and increments the last digit. - Commits with
feat:type is a minor release and hence the second digit is incremented. - Commits with a breaking change .i.e.
BREAKING CHANGEin the commit footer orfeat!type increments the version to a new major release and the first digit is incremented.
Go ahead and install the plugin package with npm install --save-dev @release-it/conventional-changelog.
Now, modify release-it configuration to make it aware of using the conventional change log plugin.
import type { Config } from "release-it";

export default {
  $schema: "https://unpkg.com/release-it@17/schema/release-it.json",
  git: {
    commitMessage: "chore: release v${version}",
    commit: true,
    tag: true,
    push: true,
  },
  github: {
    release: true,
    tokenRef: "GITHUB_TOKEN",
  },
  npm: {
    publish: false,
  },
  plugins: {
    "@release-it/conventional-changelog": {
      preset: {
        name: "conventionalcommits",
        types: [
          {
            type: "feat",
            section: "Features",
          },
          {
            type: "fix",
            section: "Bug Fixes",
          },
        ],
      },
      infile: "CHANGELOG.md",
    },
  },
} as Config;
Other commit specifications are also supported, but we will only cover conventional commits. The preset setting above will help us manage the CHANGELOG.md file with dedicated sections for different conventional commit types.
The GitHub release notes are generated automatically, and CHANGELOG.md is maintained as well. An example of a generated CHANGELOG.md file is given below:
## [4.0.0](https://github.com/zohaib-shah/express-ts-docker-starter/compare/3.0.2...4.0.0) (2024-07-17)


### ⚠ BREAKING CHANGES

* adding changelog plugin for release-it

### Features

* adding changelog plugin for release-it ([4e64a47](https://github.com/zohaib-shah/express-ts-docker-starter/commit/4e64a4790faef3e0d85070e3aedd99e649fcfd7d))
The changelog generated contains the commit messages. Based on the commit message’s conventional type, the change log will be populated according to the configuration.
types: [
          {
            type: "feat",
            section: "Features",
          },
          {
            type: "fix",
            section: "Bug Fixes",
          },
        ],
7. Adding a GitHub action to automate the release process with release-it
What if we don’t want to run the release manually every time, but instead create a GitHub release automatically whenever someone pushes to the master branch? GitHub Actions can help achieve this functionality.
Any .yml or .yaml file inside the .github/workflows directory in the repository is considered a GitHub workflow. This .yml or .yaml file should contain instructions that are understandable and valid according to GitHub documentation here.
In the .github/workflows directory, create a new file named release.yml with the following content:
name: Release a new version

on:
  push:
    branches:
      - master

jobs:
  release:
    runs-on: ubuntu-latest

    steps:
      - name: Checkout repository
        uses: actions/checkout@v4

      - name: Setup Node.js
        uses: actions/setup-node@v4
        with:
          node-version: "18.x"

      - name: Setting Git Author
        run: |
          git config user.name 'Release Agent'

      - name: Install npm dependencies
        run: npm install

      - name: Run release script
        env:
          GITHUB_TOKEN: ${{ secrets.GITHUB_TOKEN }}
        run: npm run release
GitHub spins up an execution environment to run each job in the workflow. This execution environment is also known as a GitHub runner. Each job runs on its own runner and, by default, operates independently of the others.
Unlike jobs, steps are dependent and run sequentially. If any step fails, the job fails. There are many GitHub Actions available to perform common tasks. We can utilize these actions in steps, and we can also directly run scripts available in the project’s package.json file or any other SSH commands.
In the above workflow file, a runner will undertake the job and start executing the steps. First, it will check out the repository and then set up Node.js with the specified version. Afterwards, a git config command will set the identity for release-it git-related tasks.
The secrets.GITHUB_TOKEN is a dedicated secret available for all GitHub Actions. Since we are using release-it through a GitHub Action, we no longer need to provide the GITHUB_TOKEN through the .env file. We should also update the package.json script accordingly.
 "scripts": {
    "release": "release-it -- --ci", // no need to prefix with dotenv
  },
The GitHub workflow will run on a push to the master branch. There are many events that can trigger the workflow. Let’s modify our workflow to trigger on demand rather than on any event.
name: Release a new version

on:
  workflow_dispatch:

jobs:
  release:
    runs-on: ubuntu-latest

    steps:
      - name: Checkout repository
        uses: actions/checkout@v4

      - name: Setup Node.js
        uses: actions/setup-node@v4
        with:
          node-version: "18.x"

      - name: Setting Git Author
        run: |
          git config user.name 'Release Agent'

      - name: Install npm dependencies
        run: npm install

      - name: Run release script
        env:
          GITHUB_TOKEN: ${{ secrets.GITHUB_TOKEN }}
        run: npm run release
Changing on: to workflow_dispatch: allows us to run this workflow from the GitHub UI. Navigate to the “Actions” tab of the repository, and you should find a link to run the workflow in the left panel.