Laravel database migrations are useful for performing database operations without going deep into SQL syntax.We can create and modify tables using migrations.
With the help of laravel database migrations, we can also implement version control for our database schema if we have a team of multiple developers working on same project.
We will be understanding this concept by going through following steps:
- Configuring MySQL Database in Laravel Application
- Creating Laravel Database Migration using PHP artisan command
- Creating a table in MySQL Database using Migrations
- Alter table using Laravel Database Migrations
Configuring MySQL Database in Laravel Application
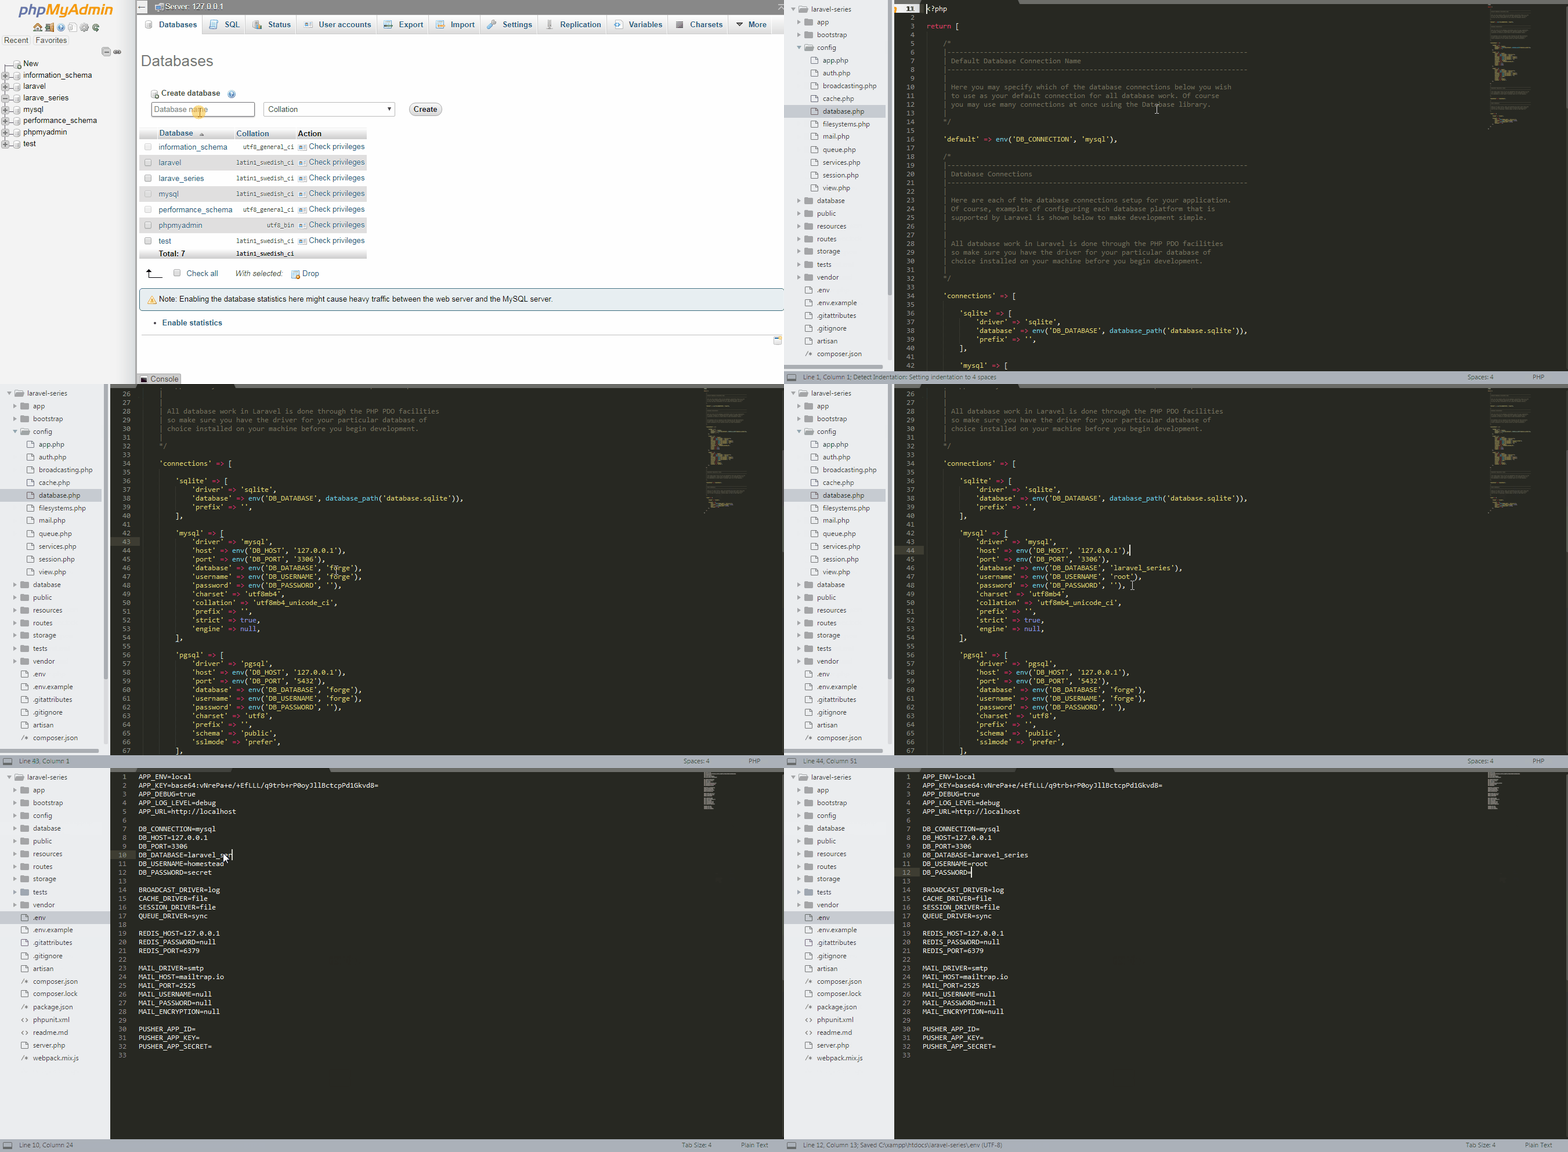
Configuring MySQL database in your laravel application consists of following points:
- Having a database name and a user with proper permissions.
- Adding database information in database.php file under config directory.
- Adding database information in .env file under root directory of application.
In our case, we are using localhost. I have created a database named “laravel_series”. We are using “root” user with no password, which is good for learning purpose but not for production environment.

Creating Laravel Database Migration using PHP artisan command
Laravel provides us with a great command line utility called php artisan. We can use this tool to accelerate our development process. By using this command line tool, we can create code snippets without writing them every time.
Following php artisan commands are useful when we work with laravel database migrations:
php artisan make:migrationphp artisan migrate:rollbackphp artisan migratephp artisan migrate:rollback --step=2php artisan migrate:reset
We create migrations by using php artisan make:migration migration_name command. All migrations live in migrations directory inside database folder in root of the application. By default, Laravel has two migrations in this directory, these migrations generate users and password reset tables when we first run php artisan migrate command.
Navigate to the root directory in your command prompt, here we can run artisan commands. Let’s create our first migration by typing php artisan make:migration products. Upon running this command, notice that a file named products.php prefixed with current timestamp has been generated in migrations directory. The content of this file are as follows:
Two functions .i.e. up() and down() are already listed in the file. The up() function executes when we run the migration. While the down() function runs when we rollback the migration.
Logically, whatever actions we want our migration to perform in our database, we should write it in up() function. We should revert all those changes in down() function.
Creating a table in MySQL Database using Migrations
The command
php artisan make:migrationhas two additional options .i.e.--tableand--create.The
--tableoption specify the name of the table we will be using in our migration file. We can use--createoption to include table creation code in the migration file.Let's explore generating a migration file with
--tableoption. Go to your application root directory in command prompt and type the following command:
php artisan make:migration product_with_table --table productsThis command will produce a file in migrations directory as follows:
Comparing this file with the one we created using php artisan make:migration products command, In this file we are also having table function of Schema class pre-written for us considering the table products as we supplied in
--tableparameter.Now we have arrived at the most important point of this post. So far, we have not written any useful logic in our migrations. With all the work in previous sections, even if we had run
php artisan migratecommand, It would not have made any impact on our database.To have table creation logic in our migration file, we need to make use of
--createoption. Go to the root of your laravel app in command prompt and type the following command:
php artisan make:migration --table products --create productsRunning the command with
--createoption yields following code in migration file:increments('id'); $table->timestamps(); }); } /** * Reverse the migrations. * * @return void */ public function down() { Schema::dropIfExists('products'); } }We can see that by using
--create, we have table creation code inup()method and table drop code indown()method.If we are creating or modifying tables using schema builder, we have to use the standards mentioned here. All the MySQL data types are covered in schema builder. We can define default values and set primary keys etc.
Let's analyze the table creation code below:
Schema::create('products', function (Blueprint $table) { $table->increments('id'); $table->timestamps(); });This minimum table structure has id,created_at and updated_at fields. If we want to have more columns we can just modify this code according to the schema builder rules.
$table->increments('id');means that we will be having an id field which would have auto increment and primary key features.$table->timestamps();ensures that we will be having two timestamp fieldscreated_atandupdated_atLet's go to the migration file and add
$table->string('title');to add a column title in the table before we create the table by runningphp artisan migrateNow go ahead and run
php artisan migrate. This will create products table in your database with four columns .i.e. id,title,created_at and updated_at.Running
php artisan migratecommand has actually executed theup()method and created the table. If we runphp artisan migrate:rollback, It would execute the down() method and ultimately, drop the table from the database.Alter table using Laravel Database Migrations
We want to add a column price in our products table. We need to create another migration file specifying the table.
php artisan make:migration add_price_to_products --table productsThe newly created migration file has
up()method as shown below:public function up() { Schema::table('products', function (Blueprint $table) { // }); }Just add one line
$table->float('price');so that theup()method should look like as follows:public function up() { Schema::table('products', function (Blueprint $table) { $table->float('price'); }); }Ideally, anything we are doing in
up()method, we should reverse it indown()mehtod. Here, we are adding a column "price" inup()method so we should drop this column indown()method. This way, if the migration is rolled back the column "price" would be deleted. Thedown()method should look like below:public function down() { Schema::table('products', function (Blueprint $table) { $table->dropColumn('price'); }); }Having migration file ready with "price" column addition code, we should run
php artisan migrate. Just check the table, It should have price column added.Conclusion
I have tried to make you understand laravel database migrations easily. In my upcoming posts, I will be discussing laravel eloquent. Share your thoughts on this post. Thank You.


